I am still here,..
I do have a few projects to show,..
I beg patience my friends,..
I am still here.
.
Sunday, November 29, 2009
Wednesday, September 30, 2009

On August 11, my father suddenly passed away. It was unexpected, unwarranted and unbelievable. I have been processing how the world is now different but has not changed and sadly I have not been drawing.
In the forefront of my mourning I was supported by dear friends and loving family,.. some expected and some surprisingly unexpected. A group of people who mean a lot to me were so kind as to remember me in my time of need and I sent them a personally handmade card of thanks. They mean that much to me and it was a meaningful way to get me back into drawing.
======
I am getting back into drawing, slowly but surely. I am thankful I was able to share my art with my father and only wish I could have seen his eyes when he looked at it first hand. There are a few projects in the near future which will be for him but I will try to insert some more varied fun projects within them.
It is nice to be back,.. life goes on. Thank you all.
Monday, August 10, 2009
Churches (phase 2)
Here is another Church,.. this one in East Brewton.
First Baptist Church of East Brewton

(stay tuned for more)
First Baptist Church of East Brewton

(stay tuned for more)
Sunday, August 2, 2009
Peggy - (delivery)

My father received the drawing of Peggy on Friday and called me to let me know what he thought. The call was very short (a minute or two), he told me he liked it. He had a hitch in his voice and that just made me wish I could have been there to see it in his eyes.
Anyways,.. here is a picture of the final image he received. Unframed since it was easier/safer to ship as well as the frame color and matting might be better for him to choose.
Thursday, July 23, 2009
Heterometrus Spinifer (completed)

,... here is the finalized predatory arthropod also known as a Scorpion.

Not sure what prompted me to draw this, but it was fun (and truly creepy).
Wednesday, July 22, 2009
Dragonfly (update with more stages)
A few months back my wife asked me if I could possibly draw a Dragonfly for a friends birthday. I was honored and proud that she asked me and intruiged that I had not thought of drawing an insect. I started and realized most of the drawing until I reached a point where I thought I was done but was not very happy with the realism. So I turned to the extremely helpful experience of a few folks at Artpapa.com - (thanks again guys). Below you will find my process/progress,...
I started with a freehand outline which bares being mentioned since until then I had always used a grid matrix to transfer an image.

Once the eyes, thorax and front nodes of the wings were established the shape started showing itself.

The wings followed but I got a little carried away with the minor nodes in the wings and they turned out to be darker than intended so I had to lift/erase some of the graphite.

I completed the wings and then the abdomen but it seemed a little thick. However I continued with the wood fence boards as background since to be honest I really did not know yet what to do with the 'think' abdoment other than erase and redo.

Finally I turned to Artpapa for help and as is evidently shown their help was invaluable. Darkening in the right places (to thin out the abdomen), applying shadows (to add realism) and making the wings semi-transparent (which they are), just makes this Flame Skimmer Dragonfly simply pop off the paper (at least I think so).

Finally it was presented to my wifes friend (on 7/22/09) and here it is in the frame. Unfortunately the glass is reflecting the light and myself as I photograph this but I have to admit I am proud of this piece.

Happy Birthday Marsha!
Monday, July 20, 2009
Heterometrus Spinifer (wip)
Been busy with life and what-not as well as a short mini-vacation with the misses.
Well for some unexplainable reason I thought drawing an arachnida family member more precisely a Heterometrus Spinifer would be fun. The dark shiny sectioned exoskeleton, the trichobothria (fine dermis hairs for detecting vibrations), and the almost mechanically hindged joints are wonderful subjects to try and duplicate.


On the latest image above you can see where I started working the darker graphite into the abdomen and tail. So far I have only used an HB and 6B pencils and very little erasing.
More to come,..
Sunday, July 5, 2009
Churches (phase 1)
I've been on vacation, well to be accurate my spouse has been on vacation since I myself am on perpetual vacation being a stay-at-home-what-ever-I-am (presently employment challenged).
I have not worked any major new projects or attacked some pending ones, but I did do these sketches of local churches. They are all free hand, as my usual process is to grid a photo and transfer it to the drawing medium. The grid method does feel like a slightly cheating method to me but it does allow me to change the size of the original photo. Also, being freehand, my angles are a little off in some places and I took some minor liberties which will be hopefully indistinguishable.
Cornerstone Community Church

First Presbyterian Church

First United Methodist Church

They were all done with a simple HB and hard eraser on 9"x12" medium weight paper.
You might have noticed I entitled this post as "phase 1" since I will be posting more drawing/sketches of buildings in my home town. I chose these 3 to start with because they were so different in their architecture. There are many interesting buildings in and around Brewton,.. I will enjoy this long term project.
Friday, June 26, 2009
Peggy - Completed.
Peggy is done,.. here are a few pictures of the final stages.
Another great learning experience with little to no experimentation or practice. By that I mean that I usually will try certain techniques on scrap sketch pads to see how they feel or how I can make the final look I want (like furry ears or a wet nose). Layering, shading, smugging and other tricks come into play, then I select the best option,.. but with this one, I simply worked on the drawing (just felt right).
Almost done here,... (there are always last minute tweaks)

Here is a detail of her face, (I like the eyes).

I am pleased with most of the drawing, the head in particular but the body not as much. The texture of the paper is too course for what I wanted to accomplish, but all in all when you stand back and look at the entire drawing,.. I guess it is not bad and you get some sense of what she was feeling.
Finally,... done! (maybe)

In the end I added a scarf (seen below her right ear), because she always had that red scarf/bandana on, even though you could not see it in the photograph. Now all I need to do is seal it and send it. I will have to request the help of my brother and sister in law for the frame since I am not sure what color to go with.
My usual tools were an HB, 2B, 6B and 8B, (most the 1st and last) a kneaded eraser, clic eraser (with a bevel cut) and some tortillons (for the near black areas). The dimensions are 11" x 14" on 70lbs acid free heavyweight paper.
Peggy was a wonderful dog and much more than a pet for my parents. I know she is missed and I hope this drawing is good enough to be shown in their home.
Thursday, June 25, 2009
Peggy (wip) -- continued
My drawing of Peggy is coming along nicely.

I am actually proud of this one so far.

Not perfect when compared with the photograph, but I believe when I am done it will be better. As usual it will never be perfect and eventually it will hopefully be good enough to be gifted to my Dad.

I am actually proud of this one so far.

Not perfect when compared with the photograph, but I believe when I am done it will be better. As usual it will never be perfect and eventually it will hopefully be good enough to be gifted to my Dad.
Thursday, June 18, 2009
Stonehenge - completed
Here is my completed work of Stonehenge.
First the photograph by Frédéric Vincent (Merci monsieur), which I used,...

,.. and then my graphite version.

I am pleased with this one. Although I will be the first to admit it was as easy as it looked. Just plenty of shadows and shade. The clouds could use some more detailing but I decided it was good enough. As I mentioned this was an ego piece, but still lots of fun and in reality we need to do something for ourselves every now and then.
Pencils used were an HB, 2H, 6H and conte 555 as well as my usual assortment of erasers and tortillons for the clouds and grass.
Wednesday, June 17, 2009
Stonehenge (wip) ...continued
It is a good experience but turning out to be more for my ego than a real learning experience. However I did learn that when drawing rocks, stones or rough terrain - the paper you use can be very important. I used a slightly course paper and it was helpful. It was all done with an HB pencil which I had let the lead out and worn down to a beveled edge. Other than that I erased (shadows) and smudged a little with my fingers (clouds).

I suspect I will have to use darker graphite to complete the ground and bring out the clouds,.. I might even add depth to the darker shadows.
In the close up below you can more easily see how the texture of the paper helped establish the texture of the stones.

I am still working on "Miss You All" but my next project will be entitled "Peggy".
Fathers Day is coming up and I thought I might draw my parents golden retriever (Peggy) whom they lost to old age earlier this year. She was a beaut.
I hope to post my start of "Peggy", an update of "MYA" and the completion of "Stonehenge" soon.
Sunday, June 14, 2009
Stonehenge (wip)
Last week I was sadly kept away from the drawing board,.. need to do what needs to be done to pay the bills some times. Meanwhile I kept drawing "Miss You All" in my head and noticed that I was struggling with shadows,.. actually to be precise it was the conversion of multiple colors to scaled grays that was difficult.

I remembered this photograph of Stonehenge (by Frédéric Vincent) with all the shadows on gray stone and thought it might help me attain a better skill set for shadows and then I can work on the conversion of colors to grays. I will grant you that it is a rather dull picture with no feel of activity - BUT it is Stonehenge and has a magical sense of its own.
Here is what I have so far,..

Thus far I have only used an HB pencil and will no doubt use many more shades before it is completed. Matter a fact, since it is a test project and learning peice I might work on it until I over-work it,.. but that is when you learn the most.

stay tuned for more,...
Sunday, June 7, 2009
Dragonfly (from wip to Done)
Last weekend my dear wife suggested I try to draw a dragonfly for a friend of hers. I was instantaneously intrigued. The insect eyes, the translucent wings, the bulbous body, the vibrant colors,.. oops, ok, no color,.. but maybe I could relate color with shades of graphite gray.
Well, (as excited as I was) I drew it in almost one sitting. Followed by a week of updating and tweaking it for myself. I received some amazing advice/recommendations from fellow pencil brethren and sisters from Artpapa and once applied, they were well worth the effort (at least I believe so).
Here is the beginning (7am),..

... middle (11am),..

... and end (4pm),...

... and finally a week later the completed work.

Now the technical talk:
The dimensions of the final project are 12"x9" on 65lb acid free paper. It was suggested I try a less coarse/rough bound paper for highly detailed projects as this one (especially when it is a potential gift), a smoother paper might have been easier to work said details in with as well (mental check on that one and thank you Imweil). Tools used were an HB, 2B, 6B, kneaded and stick eraser as well as a small and medium tortillon.
I am still not entirely pleased with it (I never am), but I get the effect of realism I was trying for and hope it is pleasing to the eye. Maybe once framed it will seem better, but for now I think I will let it be and move on.
Saturday, May 30, 2009
Betty Engine (completed)
Done and done.

I quit counting the hours on this project at 40, but suspect it was about 65 or so and to be honest I think I could spend more time on it still (and probably will until I seal it). I did get a wonderful suggestion to make the darks darker and it did make the chrome effect 'Pop'. I could not manage to get the dark effect I wanted with the tools I had so I rode to town yesterday and purchased a 6B,.. I believe it made the difference.
Below is another close-up detail to prove how somethings look better from a distance,...

,... but this close up it shows my pencil work, shading, lack of blending and inaccuracies. Having said that, I am still proud of the final work.
The dimensions of the final project are 12"x9" on 65lb acid free paper. Tools used were an HB, 2B, conte #555, 6B, kneaded, pink and stick eraser as well as a small and medium tortillon.
Thanks for reading along and stay tuned for my next project.
Tuesday, May 26, 2009
Betty 3 and 4 (with a detail)
Another update with an interesting detail (well interesting to me).
Here is where I was at when I started earlier,...

,... and here is where I finished today.

Well that is the art to date and what follows is a detail (bottom left hand) and some ramblings about what I have learned (there might even be a technique/trick there).
Darker pencils (B4, B6, B8) are something I could really have used here. Sadly all I had was HB's and a B2, however I did find a Conte #555 which helps make the dark areas as black as possible but does add a texture if I am not careful (you can see where that might have happened). Otherwise the #555 has been good as long as I use it lightly and blend it into the page strategically with a tourtillion (or for larger areas I use my fingers - can't seem to break that habit).
Also I have learned it is easier to "undraw" using a kneaded eraser or for more pronounced lines I use a pentel clic eraser which I cut at a sharp angle. This is seen in the detailed image below.

On a more personal note, I should mentioned how surprising it is (even for this artist) that when you look at a project as busy as this one is, how the details are sometimes insignificant on there own but the overall effect is wonderfully pleasant to the eye (at least I hope so).
Sunday, May 24, 2009
Betty (wip) update
Here is a Betty update,...

... coming along fine isn't she. I have a few proud spots, a few "Hmmmm" spots and a few that definately need some tweaking, but all in all I am still excited and anxious to see the final product,... I sure am learning a lot with this one.
Maybe,.. just maybe I will try my hand at a Gregg Stone specialty, a 'trompe l'oeil'.
Shading Exercises (and avoidance)
Under the guise of doing some shading exercises as shown below, I technically avoided working on the Betty Engine. In all seriousness, I truly do enjoy the engine but I quickly noticed that there is an exuberant amount of shading to simulate reflective chrome and and a plethora of tubes, hoses and wires in a 3 dimensional state (also, it is horrendously detailed). So to practice my pencil control from my elbow instead of my wrist I did the Wolverine and Spiderman below. Apparently you get more flexibility from the elbow than from the wrist - I concur. Neither are great and both are slightly different in style (I believe the Spidey is more realistic and Wolvy more cartoonish), but the shading study was quite indispensable.
It should be noted that both works are reproductions from images off the Internet.


Back to Betty,...
It should be noted that both works are reproductions from images off the Internet.


Back to Betty,...
Wednesday, May 20, 2009
Betty (wip)

Here is a close up of my bikes engine. Her name is Betty and she always brings me back home.
All the chrome looks good in real life but when you try and reproduce it as pencil art,.. well, I'd rather be polishing the real thing. I suspect the near midnight darks and paper white lights will be interesting to learn.
I am using a 2B, HB and 2H, with various erasers (which I will certainly use a lot) and some tortillions.
Stay tuned,.. more to come.

Monday, May 18, 2009
Eye and Mouth Study
 I occasionally do some simple study work to practice and figure out how to draw something of interest. For example these 'eyes' and 'mouths' express so much simply on their own, that once I can work them into and around an entire face I believe I will have a good handle on how it all works.
(they look a little creepy on their own, don't they)
Tiger
 My latest is this tiger I photographed at the Animal Kingdom Disney. All these drawings are done with simple HB pencils,.. I expose the lead about 1/4 inch and bevel the tip with some fine sandpaper. I recently started using a soft kneaded eraser to control the shading and that showed me that I should probably start working with different leads as well. I will let you all know where I go from there and you will see first hand how it progresses.
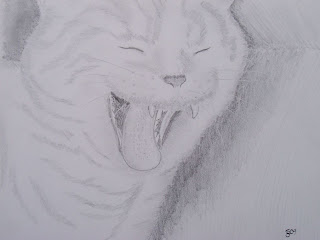
Is he Laughing at me?
This is my cat 'Tail' in mid yawn, but I sometimes think he is simply laughing at me for continually cleaning his litter box. Of course I say "my cat" when I often suspect he owns me.


Subscribe to:
Posts (Atom)